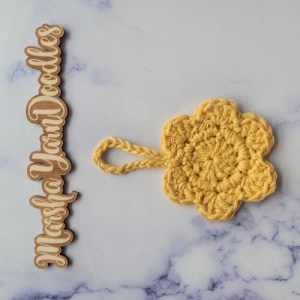
Monthly Free Pattern: Hanging Christmas Ornaments
- Nov 29, 2023
- 4 min read
Updated: Oct 8, 2024
The “Hanging Christmas Ornaments” crochet pattern, which includes all 6 designs, is also available as a premium PDF download on Ravelry.
If you’re looking for quick, easy & FUN hanging ornaments to make for Christmas, then you have found the perfect crochet pattern.

Each ornament can be worked around
a milk/juice jug plastic ring for
additional stability.
They can also be made without a ring.
Instructions include a basic hanging ornmanent that can be worked with 3 different borders.
The pattern for this style can be found below.
Also include in the “Hanging Christmas Ornaments” premium PDF are separate instructions to make hanging ornaments of a snowman, mouse, & 5 point star.
These hanging ornaments will be the perfect addition to your tree, and they make great stocking stuffers too. You can even add them to a garland or wrapped gifts for the perfect festive touch.

Materials
➤ Yarn: # 4 / Worsted Weight of any fiber.
NOTE: I used Lily Sugar ‘n Cream
➤ Yardage: 10-30 yds
➤ Hook: 5.5 mm
➤ OPTIONAL:
– Wiggly eyes (if you want to add facial features)
– Plastic milk/juice jug ring (~1.5” across center)
NOTE: Each ornament can be made with or without ring.
Ring gives ornament stability to help keep its shape.
➤ Stitch Markers, Scissors, Darning Needle
Stitches & Abbreviations
US Terminology
➤ * * = Repeat stitch pattern between * *
➤ Ch# = Chain number of times specified
➤ St/Sts = Stitch/Stitches
➤ SS = Slip Stitch
➤ SC = Single Crochet
➤ HDC = Half Double Crochet
➤ DC = Double Crochet
➤ SHELL = 5 Double Crochet worked in SAME st
Notes & Special Instructions
➤ Chains at beginning of a round/row NEVER count as a stitch.
➤ Total number of stitches per round/row in (#) at end.
➤ I tend to crochet TIGHT, so you may need to adjust your hook size to accommodate.
➤ I suggest using the invisible join for a seamless look when finishing off.
Heart Hook Home video tutorial for Invisible Join
➤ First DC Options: In this pattern, the 1st DC st in rows/rounds will always be noted as a regular DC. There will be NO Chain instructions on rows/rounds beginning with a DC.
**Use your preferred method for 1st DC stitch of these rows/rounds.**
1 – Chainless Beginning DC: This is the technique I prefer to use & this pattern is written using it. I use this same technique for 1st DC/FPDC/BPDC of rows/rounds.
Moogly Video Tutorial for Chainless Beginning DC stitch
2 – Stacked SC: Stacking 2 SC will result in a similar look to a DC st without added bulk of a Ch2. Brianna K Video Tutorial for Stacked SC
3 – Ch2: This will get your sts to height of a DC & then place a regular DC in 1st st of row/round.
Basic Hanging Ornament
NOTES: | At end of each round: SS to 1st st to join and do NOT turn. REMINDER: Use your preferred method for 1st DC stitch of these rows/rounds |
Start | Magic Circle OR Ch6 & SS to join circle OR Ch3 & work Rnd 1 into 1st Ch made |
Rnd 1: | 12 DC in circle. (12) Cinch circle closed. |
Rnd 2: | TIP: On back/inside of circle, secure tail with a SS around 1 or 2 sts & then crochet over beginning tail as you work each rnd to hide your end. NOTES: This rnd will be worked AROUND plastic ring. If you do NOT want to use a ring, just proceed as normal. Ring gives ornament stability to help keep its shape. Ch1 loosely or use Ch2 (instead of Ch1) if working around ring. Ch1, 2 SC in 1st and each st around. (24) Do NOT fasten off. Proceed to BORDER Pattern option of your choice. |
3 BORDER OPTIONS
NOTES: | Complete through “BASIC ORNAMENT BODY Pattern” before working this section. All border options work in increments of 4 sts. |
Option 1 | SCALLOP (SHELL) BORDER SK1, SHELL, SK1. SS in next st, SK1, SHELL, SK1. Repeat around. Create hanging loop: SS in 1st st, Ch15 (or desired amount), SS in same st again. (6 Shells) Fasten off & weave in ends. |
Option 2 | LARGE TRIANGLE Ch1, SC in 1st st, SK2, 2 DC in next st, Ch1, 2 SC AROUND the post of 2nd DC. SC in next st, SK2, 2 DC in next stitch, Ch1, 2 SC AROUND post of 2nd DC. Repeat around. Create hanging loop: SS in join st, Ch15 (or desired amount), SS in same st again. (6 Large Triangles) Fasten off, & weave in ends. |
Option 3 | SMALL TRIANGLE Ch1, [SC, Ch2, SC] in 1st st. SK1, [SC, Ch2, SC] in next st. Repeat around. Create hanging loop: SS in last (unworked) st, Ch15 (or desired amount), SS in same st again. (12 Small Triangles) Use invisible join to 1st st, fasten off, & weave in ends. |
I hope you enjoy this Monthly Free Pattern! You can find all the Monthly Free Patterns HERE.
Signup to receive my newsletter so you can be kept in the loop of sales, new pattern releases, and all other Marsha YarnDoodles news.


Comments